
Welcome to Issue Tracker
Welcome to the Issue Tracker user guide docs! These docs will guide you on using ConnectNow as a user with a registered account.
TIP
Every secure ConnectNow Issue Tracker URL starts with https://issuetracker.connectnow.org.uk. Make sure yours does too to keep your information safe.
WARNING
The UI for Issue Tracker is in active development, and documentation may change at a moments notice.
Getting in to Issue Tracker
TIP
If you've been invited to a company but never had an account on Issue Tracker, one was created for you with the same email address that received the invite. You can go reset your password to set a password and start using Issue Tracker.
Registering
First, go to https://issuetracker.connectnow.org.uk/#register.
Fill in the details asked of you. You will be sent a verification email. Click the button in the email to verify your account and start using Issue Tracker.
After registering, you'll be prompted to create or choose your company. Before continuing with creating a company, you should also verify your email.
Confirming your email and account
When you register, you will receive an email asking you to verify your email address. You need to click the link in the email to verify your email address and be able to fully use your account.
Logging in
To log in, go to https://issuetracker.connectnow.org.uk/#login and provide your email address and password.
Resetting your password
To reset your password, go to https://issuetracker.connectnow.org.uk/#forgot-password, provide your email address when asked, and send yourself a password reset email.
When you get the email, click the link to reset your password. You will be taken to a screen asking to confirm your email address, type in a new password, and confirm the new password. When you have successfully reset your password, you will be redirected to the login page, where you will able to log in with your new password.
Logging out
You can log out by pressing the 'Log out' button on the navigation bar, in the top right corner. Once you log out, you will be redirected to the login screen.
Working with subscriptions
TIP
For this section you don't need to have an Issue Tracker account.
Confirming notification subscriptions
When you or someone signs you up to receive notifications about a specific issue or category, you will be sent only 1 email to confirm you want to indeed get such notifications.
To agree to receive notifications about a given issue or category, click the button in the email within two days.
To no longer receive emails about a given issue, simply ignore the email. Do note, after two days you will not be able to subscribe to the issue again.
Unsubscribing from notifications
Once you have subscribed to an issue, every subsequent email about the issue (except when the issue is closed) will contain an unsubscribe link at the bottom.
Click the link at the bottom of the email within two days to stop receiving notifications about the given issue.
Managing your companies
Creating a company
When you first register, you will be prompted to select your company. If you see it on the list, select that one. Otherwise, you can create a new company by tapping on the "Create new" option at the bottom.

If you are already a part of one or more companies, you can create a new company by choosing the last row from the company-switcher, detailed in the next section.
Switching your active company
If you are a member of multiple companies, you can easily switch the active one. Just hover over the logo in the navigation bar and a company-switcher will appear.
Updating company settings
You can update the settings of companies you belong to. In the admin panel, tap on 'Company settings'. There, you can change the name of the company as well as the URL to your company's logo. After changing any current value, the changes will be saved automatically.
Adding and removing members in your company
You can add people to your company so they too can create issues, categories, and more. To do so, first make sure you are logged in and have the company you want to manage actively selected. Then, go to 'Company users' in the sidebar.
On this page, you will be able to see all the users in your company. To add a new user, type in the email address of the person you want to invite. They will then become a member of your company, after receiving an email informing them of their new membership.
Managing issues
Seeing recent issues
You can see your recently created issues on the 'Issues' page. Along with the issue name, you will be able to see the issue severity below it.
An issue with a line going through it indicates that it is closed/resolved.
To see more info on any given issue, click on the issue to be taken to its specific page.
Creating an issue
When you become a member of a company either by being invited or creating your own, you will be able to create issues for that company.
On the sidebar choose 'Issues', then next to 'All issues' choose 'Create new issues'. You'll be able to create your issue here.
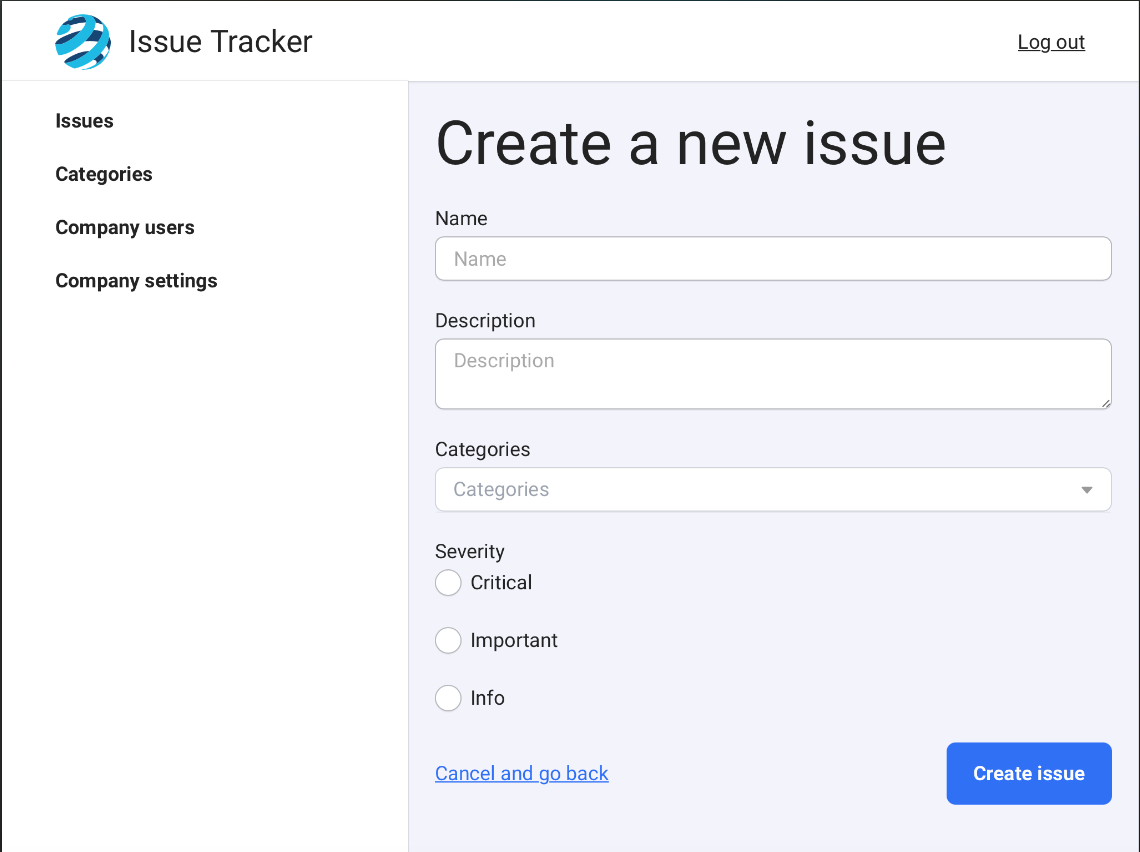
Fill in the name of your issue. The issue should be descriptive enough so the it is immediately clear, but keep it concise.
Next, fill in an initial event description. This is a good place to write "We've discovered the problem, and are working on it" or similar. The description should be relevant to the current point in time - later on you can add events as the issue progresses.
Afterwards, choose a category or categories your issue belongs to. If the category you want doesn't exist, you can create a new one simply by typing the name of the category you want and pressing the Enter key.
Lastly, choose the severity of the issue to further categorize it.
When you press 'Create issue', the issue will be created and you will be redirected to the specific page for the issue - where you can do the actions described in the following sections.
Adding an issue event
You can add events to an issue as the situation progresses. New issue events will automatically be sent to all subscribers and their webhooks.
To add a new event, find an open issue that you would like to update and click on it. Under 'Events', you will have a input field to enter the new event message. Once you're happy with it, click 'Add event' to add the event to the issue and notify all subscribers.
Subscribing people to an issue
TIP
For privacy reasons, you can only see the amount of people subscribed to an issue, but not the email addresses of each subscriber.
You can subscribe an email address to any issue. Note that when you subscribe an email address, that email address must confirm their intent to subscribe to the issue (see: Confirming notification subscriptions).
To add a new subscriber to your issue, find an open issue that you would like to update and click on it. Under 'Subscribe people to issue', enter the email address of the person you wish to subscribe, and press 'Subscribe user'. An invitation to subscribe to the issue will be sent to the email address.
If the issue is already closed, you will not see this section and you will not be able to subscribe new people to the issue.
Closing an issue
When the issue is resolved or deemed closed, you can mark it as such on Issue Tracker.
To close an issue, find an open issue that you would like to update and click on it. Under 'Close issue', write a final event message informing your subscribers of the current state of the issue. When you're happy with your message, tap on 'Close'.
Once you close an issue, you will no longer be able to update it, add events or subscribers, or delete it.
Managing categories
Creating a category
To create a new category, just add it when creating your issue. See: creating an issue.
Subscribing people to a category
TIP
For privacy reasons, you can only see the amount of people subscribed to a category, but not the email addresses of each subscriber.
You can subscribe an email address to any category. Note that when you subscribe an email address, that email address must confirm their intent to subscribe to the category (see: Confirming notification subscriptions).
To add a new subscriber to your category, find a category that you would like to subscribe someone to and click on it. Under 'Subscribe people to category', enter the email address of the person you wish to subscribe, and press 'Subscribe user'. An invitation to subscribe to the category will be sent to the email address.
Managing your API tokens and webhooks
Issuing API tokens
Issue Tracker is primarily interacted with via its very powerful API. Some endpoints require authorization, which you can do by issuing yourself a token.
If you're unsure of what this section means, contact your developer team.
You can issue API tokens to access Issue Tracker via API. First, go to your account settings. Under the 'API tokens' section, fill in the name of your new token and click "Create a new token" to create the token. The token will only be shown once; keep it guarded as you would any other secret.
Head over to the API docs for more info on using the API.
Revoking API tokens
When you need to revoke an API token, you can do so after logging in to Issue Tracker. Then, on the row of the token you want to revoke, click on "revoke token".
Creating new webhooks
You can create webhooks that Issue Tracker can notify when certain events occur.
If you're unsure of what this section means, contact your developer team.
First, go to your account settings. Under the 'Webhooks' section, fill in the name of your new webhook, and the URL it should trigger. Finally, click "Create a new token" to create the webhook.
Head over to the API docs for more info on webhooks and the events they emit.
Managing your subscription plan
Coming soon.
Install the Issue Tracker web-app on your devices
You can install the Issue Tracker web-app onto your phone as it is a modern progressive-web-app.
On Chrome and Chromium (Android)
You will be prompted by your device to install the app when navigating to it in a Chrome based browser. On a desktop device, including Mac OS devices, you will be prompted to install the application with an icon in the address (URL) bar.
On iOS
You can save the web-app to your Home screen on iOS. From the website, tap the Share button, then tap Add to Home Screen.